CoutureNode and auto-reload feature
Before talking to you about workflow and interface, I will have a short introduction to the auto-reload feature of Couture.
Each of your action is saved in a node called CoutureDataNode, this node can be found in the outliner if you turn off "DAG objects only". That means that if you save your scene and don't touch this node, you will be able to restart couture exactly where you left it!
That feature is very usefull if you are working on a large garment or you want to go back and change something.
Inteface
The interface of couture is composed of two main areas : The Outliner and The Pattern Table.
The Outliner will give you a second outliner and will sort every piece of cloth during the 3 phases of the workflow.
Allowing you to quickly find a specific piece at a specific moment.
The outliner also allow you to quickly show/hide/lock/select a group of clothes.
You can also get rig or add new piece of cloth in the tool.
The pattern table contains all the action to perform on a garment in order to have an editable mesh.
3 Phases of Couture
During the creation of the tool it was hard to come up with a good way to name the different categories of mesh used by Couture. At the end I came up with "Garment", "Pattern" and "Retopo".
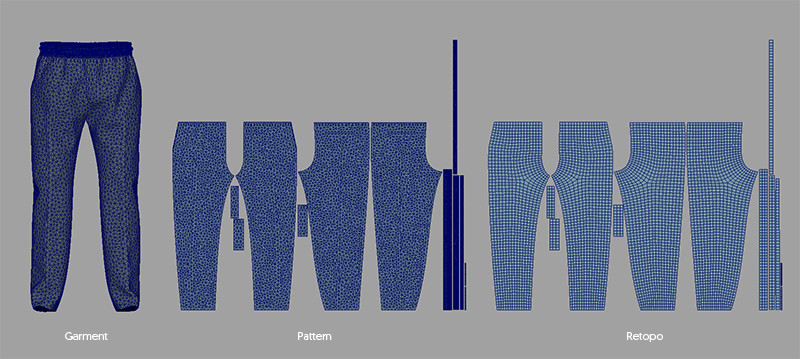
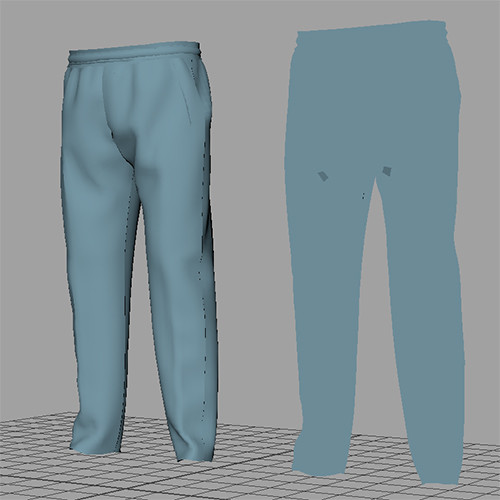
Garment : This mesh is imported straight out from Zbrush or Marvelous. It has the shape that you want to achieve, good UVs but a triangulated topology not suitable for animation.
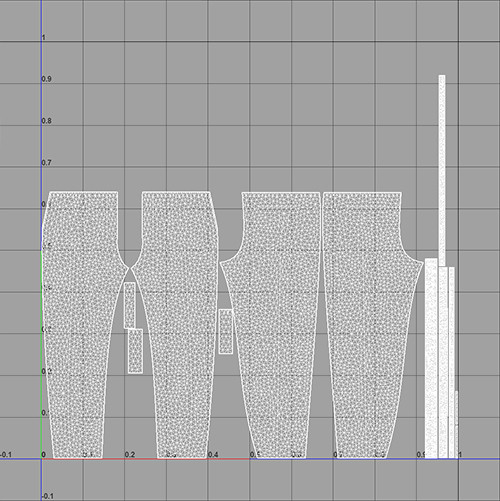
Pattern : This is the same mesh but flatten. It has the same properties including the vertex index. This mesh will later be use to transfer UVs, create blendshape and drive the wrap.
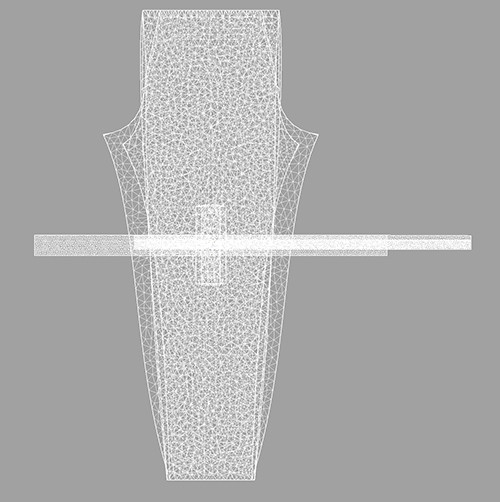
Retopo : You create this mesh by hand or using any automatical topology algorithm such as Zremesher. This topology is ready for animation and contain mostly quads. The sape of each piece of cloth must match the shape of the pattern meshes. This meshes will later be drived by a wrap on a pattern meshes allowing you to edit his topology in 2D ans 3D space.
Workflow
UV layout selected
Start maya, load couture and import a garment. First step is to have a look to your UVs, sometimes when it comes from Marvelous, the UVs are nice but pack on top of each other :
It's important to have a clean UV layout, otherwise later when you will work on your Retopo, it will be less convenient. Here is a exemple of good layout:
Luckily for you, the first button in the couture interface "UV layout selected" allow you to layout your UVs.
It's also the good moment to set the scale of your garment in your scene.
Load garments
Then select your garments and clicK on the button "Load garments", now you are ready to start and go on the Pattern table. If you have selected a mesh by mistake, you can delete or add a new piece of garment. You can also reset the import by selecting a group a new garment, Couture will ask you if you want to reset your selection, then click on the button and you are ready to go.

Each time you progress in the workflow, you will access new shortcut for each phase of Couture.
Eye will allow you to quickly show or hide.
Lock will allow you to lock or unlock the selection.
Arrow will allow you to select a whole group of mesh.
You can unlock the garments shortcuts with the button "Load garments". You can unlock the Pattern shortcuts with the button "Flatten garments". You will unlock the Retopo shortcuts with the button "Pairing flatten geometries".
Flatten garments
Couture will read the UVs of your garments and move every point of your mesh according to the U(X) and V(Y) coordinate.

How to solve an error with the flatten garments process ?
If the mesh has non unwrap UVs, this step won't work and couture will raise an error.

Even if your model seems to have UVs and looks good, it can still contain mistakes. You can learn more about this subject on this page: Mesh quality.
2D retopology process
Then it's your turn to work for couture, you will have to create a retopology of your pattern that match the shape of each pattern.
However to ease this step, Couture offers you some shortcut to speed up your workflow.
You are free to create this topology as it pleases you. You can export the flatten geometry and perform this step in another DCC, for exemple you can use ZBrush and the Zremesher feature. But you can also use the modeling toolkit.
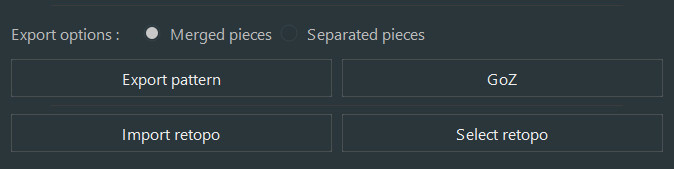
Notice that you have two export options "merged" or "separated". You can also export a simple "FBX" or "OBJ" but notice that you also have a "GoZ" button. Goz must be pre-installed on your computer.
When you are ready to go, you have two options once again, "Import retopo" and "Select retopo".
If your topology is already in the scene, use the "select retopo". If you need to import your result from Zbrush, use the button "Import retopo".
It's important to check the quality of your retopologized mesh, especially if it comes from Zremesher, you can learn more about the process here :Mesh quality.
Pairing flatten geometries
Normally, if you are using a similar workflow, you should create a blendshape between two meshes (garment + pattern) and then a wrap between 2 other meshes (pattern + retopo). You would have to carefully hand pick each meshes and it could take quite a long time if you have a garment with a lot of pieces.
Couture already know each pair of garment and pattern because they share the same name. Using the pivot position, Couture will guess a pair between a pattern and a retopo mesh.
To perform this step, simply hit the Pairing flatten geometries, Couture will go through every mesh and update the UI and all the other function for every match.
If something goes wrong (I invite you to read this page Mesh quality ), Couture will allow you to go back to the selection/import retopo and also redo a new pairing.
However, you can also use the little hand button a create a pair manually.
Transfert UVs
This button will automatically transfers UV from your pattern to your knew retopologized mesh. A precious time and quality saving trick for your final mesh !
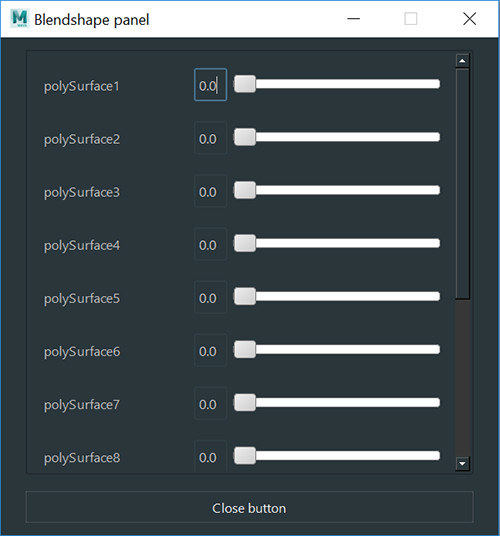
Create blendshapes
This button will create a blendshape between each garment and pattern.
Use the slider to activate every blendshape of your scene at the same time.
The little button next to this slider will open a window that allow you ton control each blendshapes individually.
Wrap pairs
This button will create a blendshape between each pattern and retopo mesh. Allowing you to move your retopo from a 2D space to a 3D space.
Soften edge selected
This button will create new normals for each mesh selected. When you create your retopo mesh it will certainly come with normals from a flat 2D surface which can look odd on 3D. This button will allow you to display your mesh with brand new normals !
Edit selected/ Cancel edit/ Apply edit
The first button allow you to select one or several retopo cloth that you want to edit. The selected meshes will turn to green and now you are ready to perform any modification that you like.
Then, if your are satisfied with your edits or if you want to cancel your modifications, you have two buttons that will open a prompt message allowing you to chose what action you desire to perform.