Disclaimer: Coiffure need an internet connexion to be launched. It’s working for Maya 2018 and above
Perpetual License > https://gum.co/vhMyu
Subscription License > https://gum.co/GcyWU
Creating your first hair texture
First thing first, you need to set a hair board project name, you can pick whatever you want. However you can only have one project per name.
The idea with this tool is to select some strand of your library, to lay them down on the grid. You can scale them and adjust them as much as you want. When you are satisfied, you can bake the textures.
When the tool will open, if you’ve created a strand by yourself, the UI should look familiar.
Strand Library
The first widget is the strand library. You can use it to browse the desired strand.

- Use this search bar to isolate hair strand with their specific name. It’s not case sensitive.
- Each strand is assigned to a category, the filter button allow you pick the category that you wish to display, allowing you to find your strands easily.
- This reload button can help you to reload the library if a member of your team edit the strand at the same time, it will redraw the strand browser
When you find your strand just click on it, the scene and the tool will be loaded. You can now move it, scale it and even modify it. Coiffure import a copy and it means that you can make changes in the scene that won’t affect the strand library. When you import a strand it will add a namespace Strand_XXX, the number will be automatically increase for each new strand. This namespace is mandatory to import other xgen file in the scene without crashing.
Swap feature
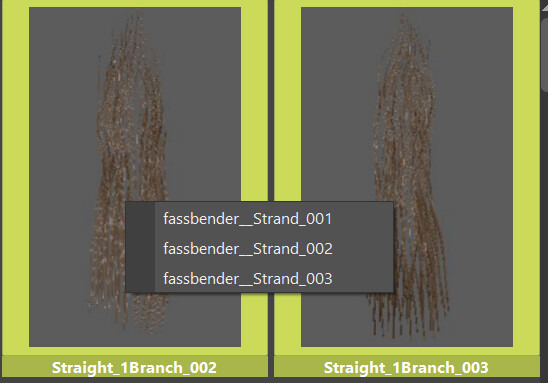
If you are not happy with a strand you have two solutions delete it and import a new one or you can left click on a strand a little pop-up will show up and ask you which strand you want to swap. The newly loaded strand will be loaded at the same size and place as the previous one.
Outliner
This outliner is similar to the xgen manager, you will find the shortcuts that you discovered in the strand generator and a widget which display the strand imported. Each strand can be expanded if you click on the little triangle on the left, new lines will be created one for each description. Let’s detail everything
Short cuts and marking menu
Above the outliner widget you will find a series of helpful button that will allow you to add guides and manage the visibility of all your strand’s description,guides description, scalp mesh, uv boxes and the grid . But there is one more thing ! While you are interacting in the 3D viewport if you hold “CTRL-ALT-MiddleMouseButton” a marking menu will open. It gathers all the shortcuts and the visibility/ tool from the Outliner.
Outliner widget
As we said earlier, each strand will be displayed in this outliner and you can expand each one of them to show its descriptions.
Now you should guess what the icon are used for, there is a new one:

- This button will allow you to reload a strand. It could have two use cases, I might want to restart/ discard your change if you push this button a fresh re import of your strand will happen. If you are working with other people or if you have several maya window you can use this button to update your strand with modification that have been pushed through the library.
- If you click on a description name you will set this one as the active description in the Xgen window.
- Once again for each description you can assign an existing shader using this dropdown menu
- This button allow you to show or hide your strand’s guides
- This button allow you to show and update or hide your strand’s descriptions
- This button allow you to show or hide the strand scalp mesh
- This button allow you to show or hide the strand uv box
- This button will delete properly an existing strand but also the files stored in the maya project.
- This button allow you to show or hide your description's guides
- This button allow you to show and update or hide your descriptions
- This button will delete properly an existing description but also the files stored in the maya project.
As you can see with this outliner you can manage the visibility of your strand at 3 levels:
At a hair board level
At a strand level
At a description level
And the good news is that Coiffure offer the same level of control in the marking menu !
Shader Manager
This widget allows you to create and manage your arnold shader in a few seconds. To create one, just set the color type among the one possible, those are just shortcut you are free to modify them as you want later. Then hit the “Add shader” button and it’s done.
Each shader will be displayed in an outliner.

1, This button allow you to assign the shader to the selected item
2, This button will open the hypershade and select the shader so you can modify it as you wish
3, This will delete the shader
The shader manager will be automatically loaded with the shader already assigned in the strand files. You are free to use them or create new shader, it’s up to you :)
Arnold Manager
This widget allows you to bake all your desired map in few clicks. You will need to pick the AOV that you want, later on each of them has a checkbox so you could manage which AOV is baked.
Each AOV will be displayed in the widget, a small icon will give you a hint about its purpose. For each AOV you have the possibility to adjust the shading network, click on start editing, the hypershade will open and a special tab should have been loaded with the shader network unfolded. You can adjust it and test the result using the arnold render window.
Once you are satisfied click on end editing.
Notice that Coiffure manage the lighting in a simple way, there is a lighting group hidden in your scene you can adjust the desired lighting by adding or removing light inside this group. At render time Coiffure will unhide the lighting group and use it for the render
Now it’s time to setup the render parameter, I created default parameter for you:

- Set the resolution a square one from 1K to 8K
- Set the Arnold sampling quality between 4 available, use the custom one if you prefer to override the parameter with your own
- Set the output format
- Set the colorspace, you can choose between linear,srgb or override it with your color management settings
- Click on bake selected to bake the AOV checked or bake all to bake everything
To display your results you can click on each green button it will open the map for you, click on “open result” if you want to open the baking folder, It’s like magic !!

Convert to geometry
If you don’t like Arnold, first it’s ok, I don’t judge ! But I still have a little tips to make your life easier. You can convert all the strand into polystrip or polytubes.
Polytubes takes longer, in fact for now it’s not coded using the Python API, so it’s better to have a break while you are converting those tubes. Polystrip in the other hand are almost instantaneously converted.
Once your done with the conversion you have possibilité to create RGB or BW random shader and to assign them automatically to your meshes. I know that it can be useful if you want to create some randomise color for your strand. Set the number of group, the type of color and hit the shuffle button. You can export the result.

UV Templates
At this point there is just one last step, the creation of a uv template based on your strand layout.
Click on the button “Launch the uv tool” ,a new window will appear. This empty canvas should look familiar because I recreated the UV window for my own purpose. At this point if you have already bake your textures, the diffuse image should be open.
Time for you to create uv’s for each strand. You can find a detailed explanation of the tool over here.
But as I said many times before Coiffure is about relying on a database and speed up the process. Let’s try the next button “Update with UV box” and voila !
If your uv box are matching your strand in the 3D space, it should create a perfect UV template instantly, each strand will have a different color making things easier.
If you have bake a diffuse map before using the UV template editor, it will be automatically loaded.
You will also be able to click on auto save, coiffure will find the correct save spot for you
Photobooth
Before calling it done, you need to take a picture and to save your hair board using the photobooth widget.
There’s 2 screen, the one on the right is a proper maya window that allow you to frame you strand and allow you to take the best picture. You can zoom in and out as you would normally expect in maya’s viewport.
You are lost the reset camera button will replace your camera at the origin of the world.
Once you are happy, hit the “take a picture” button, the result will be displayed in the second window.
Now you can update the progression status on this project, allowing you to keep track of things, especially if a whole team is working with Coiffure.
You can now click on save. Don’t forget to save your files ! You can now move forward !