Disclaimer: Coiffure need an internet connexion to be launched. It’s working for Maya 2018 and above
Perpetual License > https://gum.co/vhMyu
Subscription License > https://gum.co/GcyWU
Creating your first strand
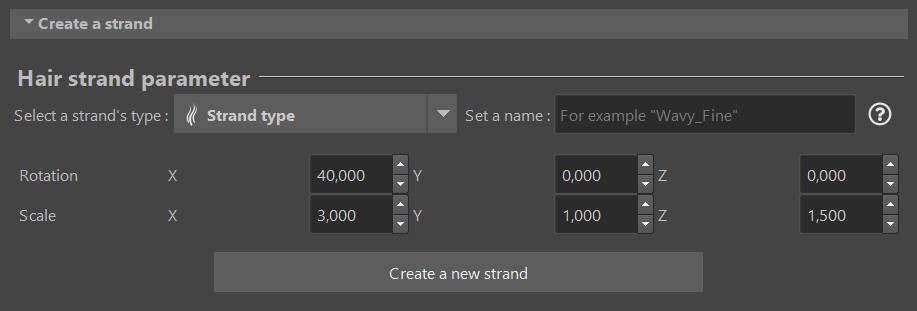
First things first you have to pick a "Strand type" category among the one available such as : Long strand, Short strand, Fur etc
Then you need to pick a name, it’s kinda hard to find a way to describe them (that way the tool relly on pictures). However I decided to apply a naming convention to help finding proper name, you could use it if you like :))
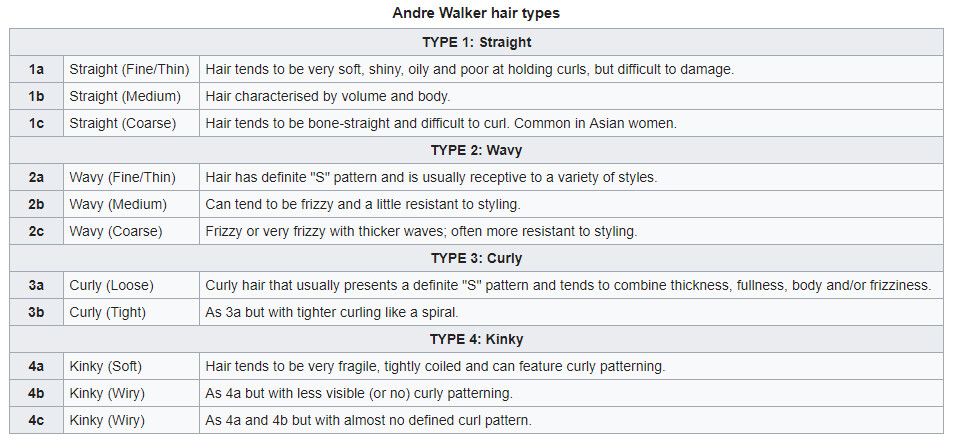
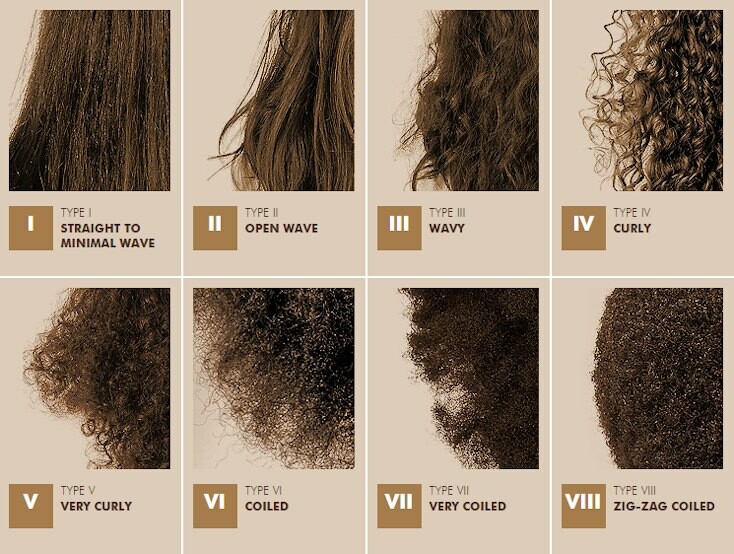
Coiffure use a naming convention for the strand which is inspired by Andre Walker hair types. You can describe your own strand as you wish but I think that this classification is a good source of inspiration. Here is a description from Wikipedia :
The Andre Walker Hair Typing System is the most widely used system to classify hair. The system was created by the hairstylist of Oprah Winfrey, Andre Walker. According to this system there are four types of hair: straight, wavy, curly, kinky.
Type 1 is straight hair, which reflects the most sheen and also the most resilient hair of all of the hair types. It is hard to damage and immensely difficult to curl this hair texture. Because the sebum easily spreads from the scalp to the ends without curls or kinks to interrupt its path, it is the most oily hair texture of all.
Type 2 is wavy hair, whose texture and sheen ranges somewhere between straight and curly hair. Wavy hair is also more likely to become frizzy than straight hair. While type A waves can easily alternate between straight and curly styles, type B and C Wavy hair is resistant to styling.
Type 3 is curly hair known to have an S-shape. The curl pattern may resemble a lowercase "s", uppercase "S", or sometimes an uppercase "Z" or lowercase "z". This hair type is usually voluminous, "climate dependent (humidity = frizz), and damage-prone." Lack of proper care causes less defined curls.
Type 4 is kinky hair, which features a tightly coiled curl pattern (or no discernible curl pattern at all) that is often fragile with a very high density. This type of hair shrinks when wet and because it has fewer cuticle layers than other hair types it is more susceptible to damage.
Then you have some parameters about your scalp mesh, it’s also possible to modify the rotation and scale later on but it’s up to you. Then you can hit the create button.
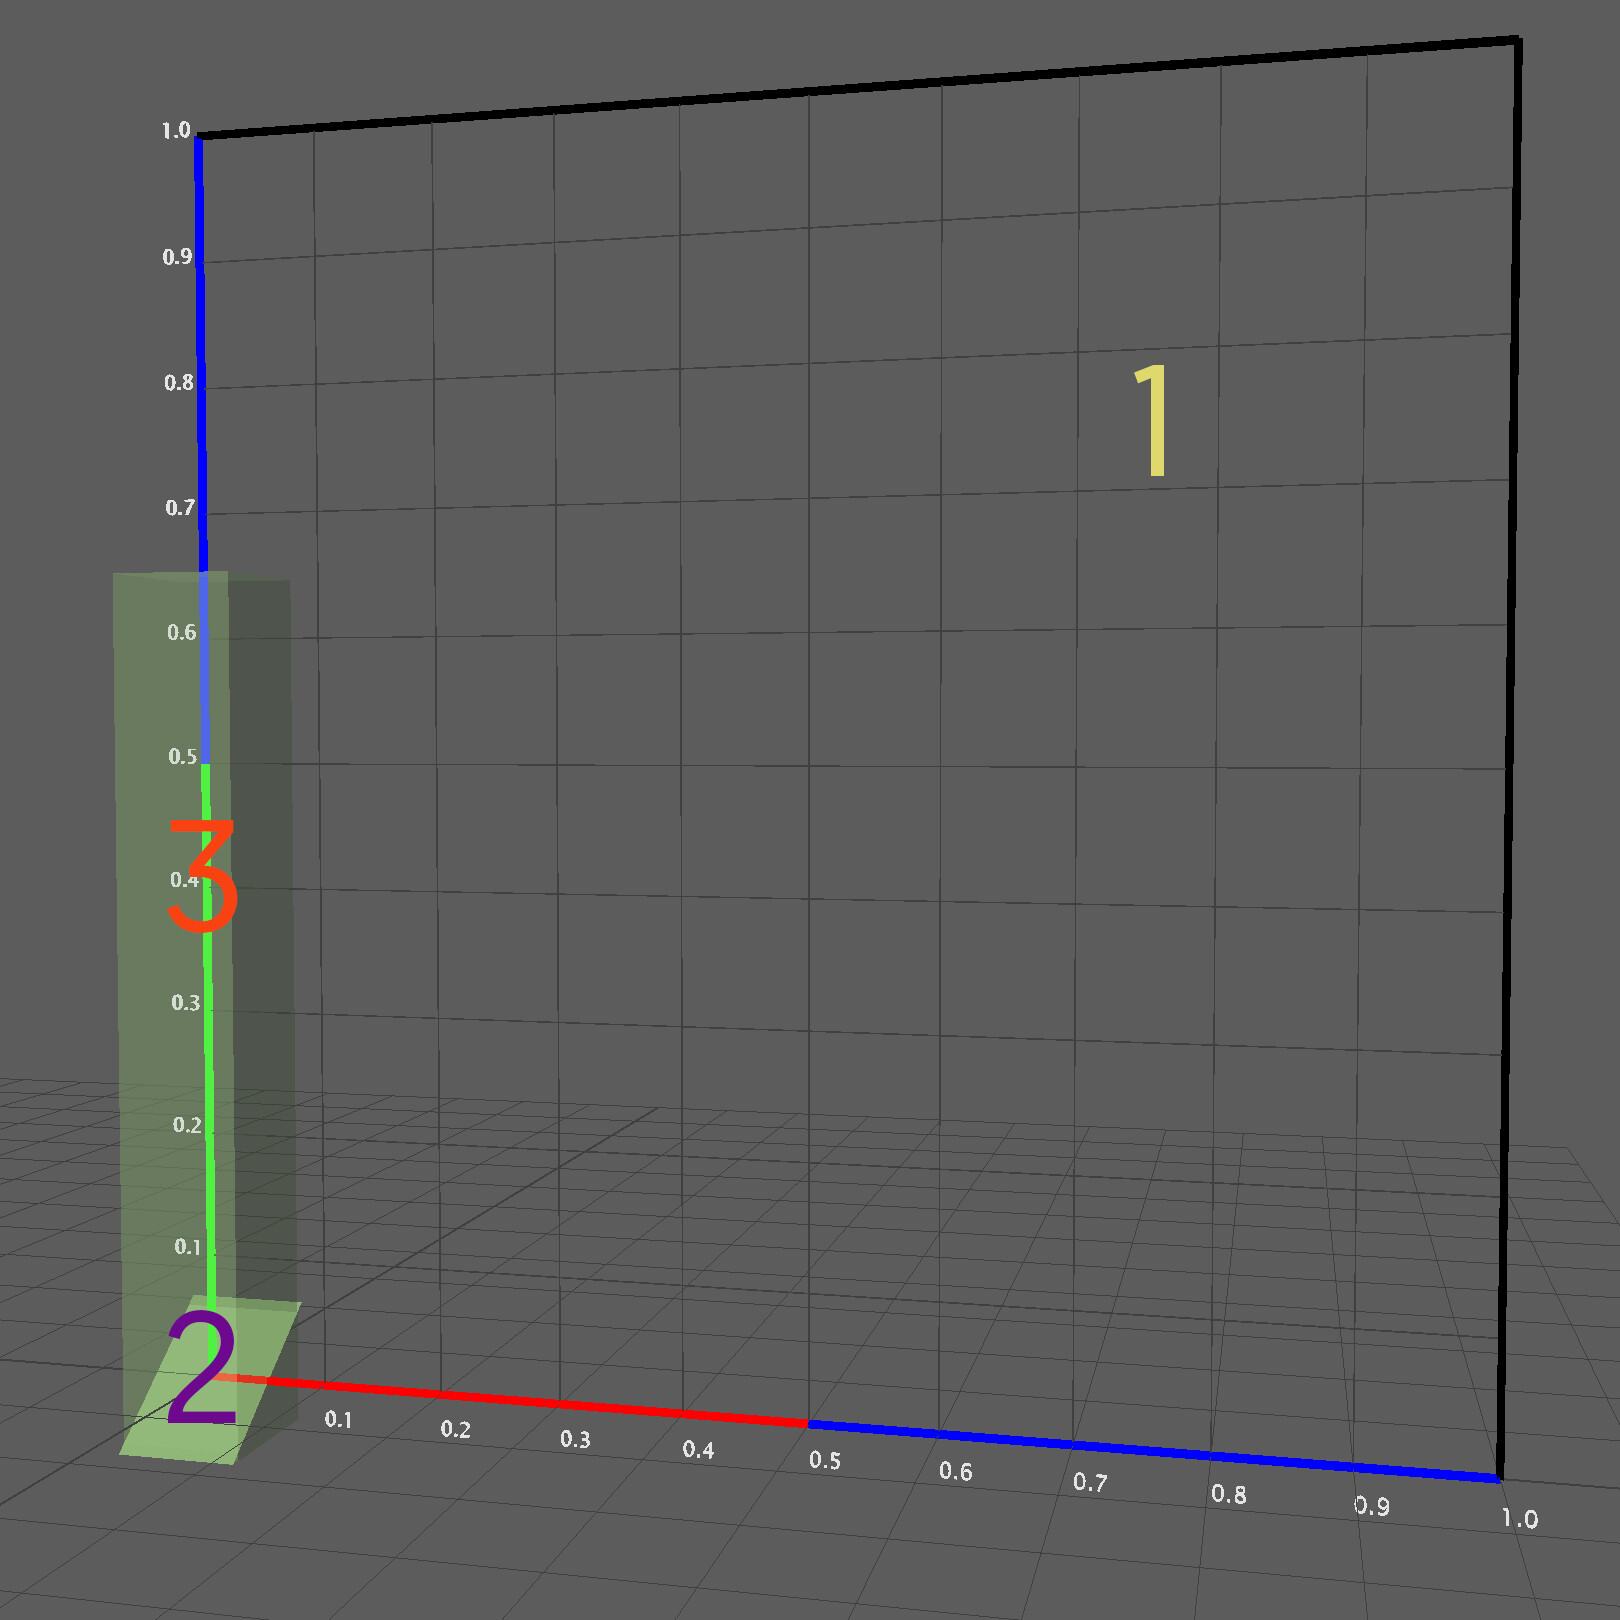
A new scene will be created and it’s not empty
1, This grid is a size reference, we will later use it to place our strand on our texture. I recommend to create strand that can fit into this grid. You can show and hide this grid it’s up to you
2, The scalp will be use by Xgen to create your strand, you can scale it and rotate it. You could even move hit, however I would recommend to let the scalp at 0,0,0 world position because each time you will import a strand it will be loaded at this position. Letting everything at the same position will be more conveignant.
3, The UV box, at this point it’s a bit early to discuss this. This box will allow to generate automatic UVs. We will make sure that each UV box fit the volume of each strand from a frontal and orthographic point of view
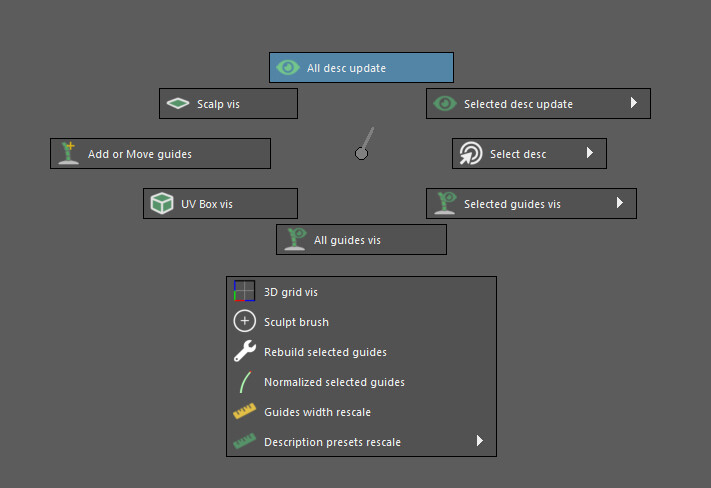
Short cuts and marking menu 

Right under the scalp parameters you will find a series of helpful button that will allow you to add guides and manage the visibility of all you description/ guides description and the 3 element that we discussed earlier But there is one more thing ! While you are interacting in the 3D viewport if you hold “CTRL-ALT-MiddleMouseButton” a marking menu will open. It gathers all the shortcuts and the visibility/ tool from the Xgen manager
Xgen Manager
This widget allows you to create and manage your description in a few seconds. To create one just set a name and a type, you can choose between spline description and groomable spline, then hit “Add the description”.
Most of us will use the spline description but it’s possible to use the other option.
You can add as many descriptions as you want, the manager will display each description in an outliner allowing you some shortcuts.
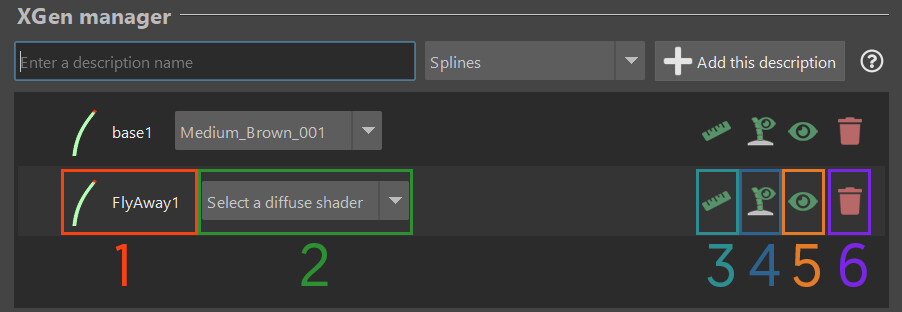
1, If you click on the description name, it will select the description in the Xgen UI. If you are familiar with working on several description, you know that sometimes it could be tedious to switch between description.
2, This dropdown menu will allow you assign one of the shaders created by the shader manager
3, This button allow you to automatically apply some size parameter to your description, it can be tweaked later it’s only a shortcut.
4, This button allow you to show or hide your guides
5, This button allow you to show and update or hide your description
6, This button will delete properly an existing description but also the files stored in the maya project.
By the way each new description will get a random guide color for your guides and it will make your life easier if you want to identify different descriptions.
Shader Manager
This widget allows you to create and manage your arnold shader in a few seconds. To create one, just set the color type among the one possible, those are just shortcut you are free to modify them as you want later. Then hit the “Add shader” button and it’s done.
Each shader will be displayed in an outliner.
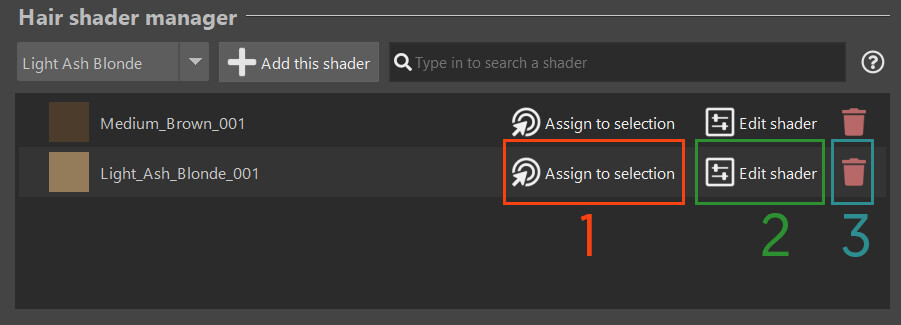
1, This button allow you to assign the shader to the selected item
2, This button will open the hypershade and select the shader so you can modify it as you wish
3, This will delete the shader
A word about custom shader parameter
This section is optional but it offers even more control over the shader of each strand. Normally if you assign a shader in arnold for xgen, it will influence the color of each hair from its root to its tip. Allowing you for example to have a gradient effect for bottom to top. But what if you want to have a salt and pepper hair effect ? Or a rainbow strand ?
Well let me introduce the custom shader parameter. You can create one for each description.
Open the Xgen window, select the description and then in preview/output you have a parameter section.
Set the parameter to color, put a name and click on the plus button. It will create a Xgen parameter which can be filled with any type of data such as painted map,code or procedural generator.
Let’s create a Ptex texture, now you are free to paint your effect. You can paint melanin in black and white colors, for example a salt and pepper effect will require to paint black hair in white and white hair in black …
You can paint a RGB color and plug this in the color attribute of your shader this will override the melanin color, as would a dying normal do. It means that you can apply even unnatural hair colors such as pink, blue or green.
To plug everything in the sahader, create an ai color parameter, set correct name and plug-it in your shader. Do a quick render and see your result.
If you create the shader and custom color parameter at this point it will be imported in each new scene.
Photobooth
Before calling it done, you need to take a picture and to save your strand using the photobooth widget.
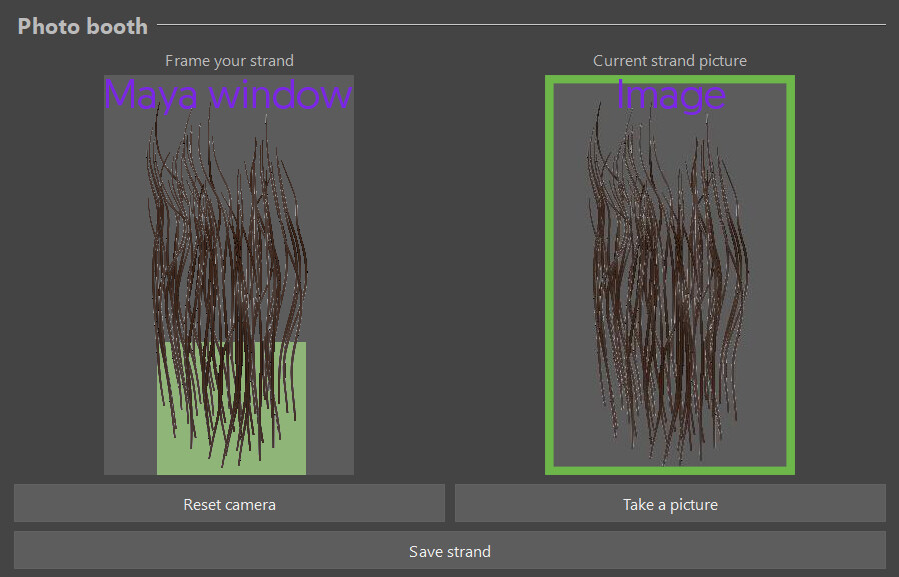
There’s 2 screen, the one on the right is a proper maya window that allow you to frame you strand and allow you to take the best picture. You can zoom in and out as you would normally expect in maya’s viewport.
You are lost the reset camera button will replace your camera at the origin of the world.
Once you are happy, hit the “take a picture” button, the result will be displayed in the second window.
You take a new picture if you prefer and hit the save button.
Edit a strand
At any time you can click on the edit strand button in the main window. It will reopen the same window with a slight difference.
The strand library will be opened. You can use it to browse the desired strand.
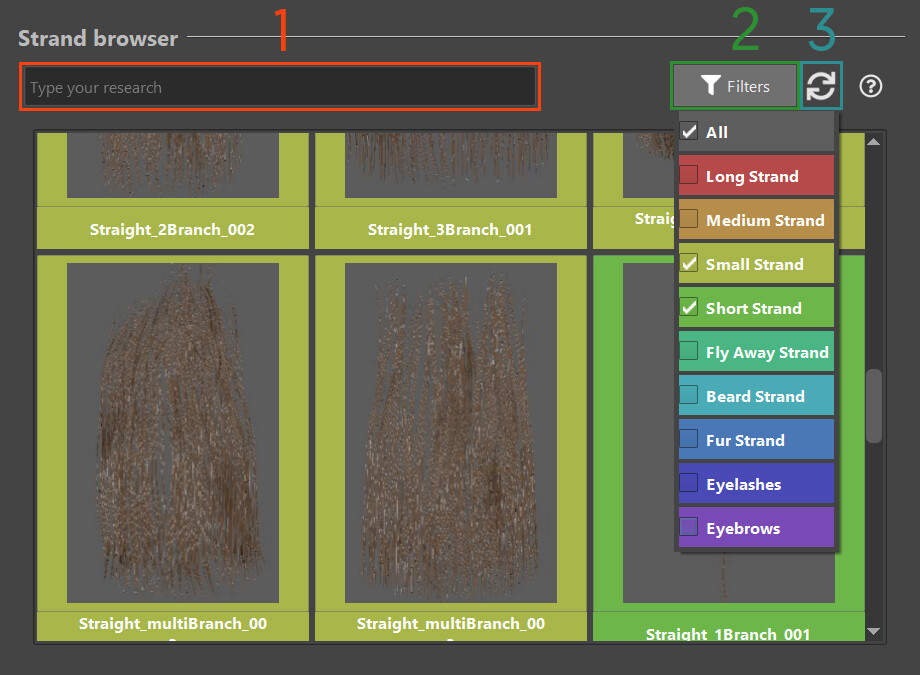
1, Use this search bar to isolate hair strand with their specific name. It’s not case sensitive.
2, Each strand is assigned to a category, the filter button allow you pick the category that you wish to display, allowing you to find your strands easily.
3, This reload button can help you to reload the library if a member of your team edit the strand at the same time, it will redraw the strand browser
When you find your strand just click on it, the scene and the tool will be reloaded. You are now ready to edit your strand, take a new picture and save the update
Now you are ready to move forward !