Disclaimer: Coiffure need an internet connexion to be launched. It’s working for Maya 2018 and above
Perpetual License > https://gum.co/vhMyu
Subscription License > https://gum.co/GcyWU
D-Day, stop tearing your hair out !
Today is a big day for me, during the last couple of weeks, I've been working on my most ambitious scripting project so far !
I know for a fact, because I personally experienced it , that real-time hair is one of the most difficult and tedious process when it comes to creating believable characters.
If you are familiar with my account and my previous projects, you know that I’m character artist but also a technical artist. I really enjoy to create tools to make everyone’s life easier and I am passionate about user experience
One day while I was working on a personal project I get frustrated, I wanted to create a lot of cool clothes for a character but at the same time I knew that it would mean a lot of hours wasted on retopology. The truth is, it’s very hard for me to finish my personal projects, I wished things could be easier so I could be more efficient because otherwise I would ending up out of motivation to finish this project.
That’s why I created a tool called Couture (With my tools you can learn french at the same time !) and it was released in October 2018. In total over 8000 people downloaded this tool and I hope it helped a lot of people with repology process. I took a common repology workflow using patterns, blendshape, wraps and tried to simplify and automate it as much as I could.
The funny thing is that I successfully managed to release Couture, but I did not finish my character ( The fan art of Chirrut Îmwe)
Coiffure: the origin story
Few months ago I did my last real-time character and you know what? The grooming part was the most boring one, because I wanted to have a great results and it means a lot’s iteration, this process can be painful. It is said that “History repeats itself”, so I swore to myself not to ever work on real-time hair until I get a better solution.
If you’ve seen my previous work, I’m a big fan of Xgen for VFX hair. During my personal progress through the uncanny valley, it might have been the most satisfying achievement. Because for years when I created character I was really unhappy with what I was capable of achieving, having bad hair on my character was ruining all the hard work underneath. But then I discovered Xgen, my first test was on this Louise hair timelapse.
I just one weak, with simple basic knowledge I was able to create a very detailed hairstyle and it was s satisfying! Then I created a couple of time lapse video called “Hairapocalypse”, I was grooming my self portrait with over 6000 guides :D
So as you can see I’ve been having a great deal of fun with Xgen, but what about realtime ?
Well until few years we are stuck with haircard and alpha textures, that’s it. And it’s clearly less fun to do, less interactive.
I discovered this workflow using Xgen to create haircards, especially Adam Skutt’s tutorial and Vadim Sorici’s breakdown. I would deeply advise to have a look at both of them.
I tried it on this character and I gave me great results but also a great deal of pain. What I could find a way to groom my character using Xgen and what I could have a tool to convert this result into haircards and texture ? That's how Coiffure came to my mind!
Coiffure’s philosophy
I had two main objectives with Coiffure : Improve speed process and improve the iterative process.
To do so I had a couple of obstacles to overcome, Xgen is powerful but also not flexible. I had to find a way to import/export Xgen files. Haircard placement and UV editing is very time consuming what if we could rely on data to spend less time on that part ?
Without further ado let’s explain the Coiffure’s workflow in detail :
Step 0: Create the desired haircut in Xgen
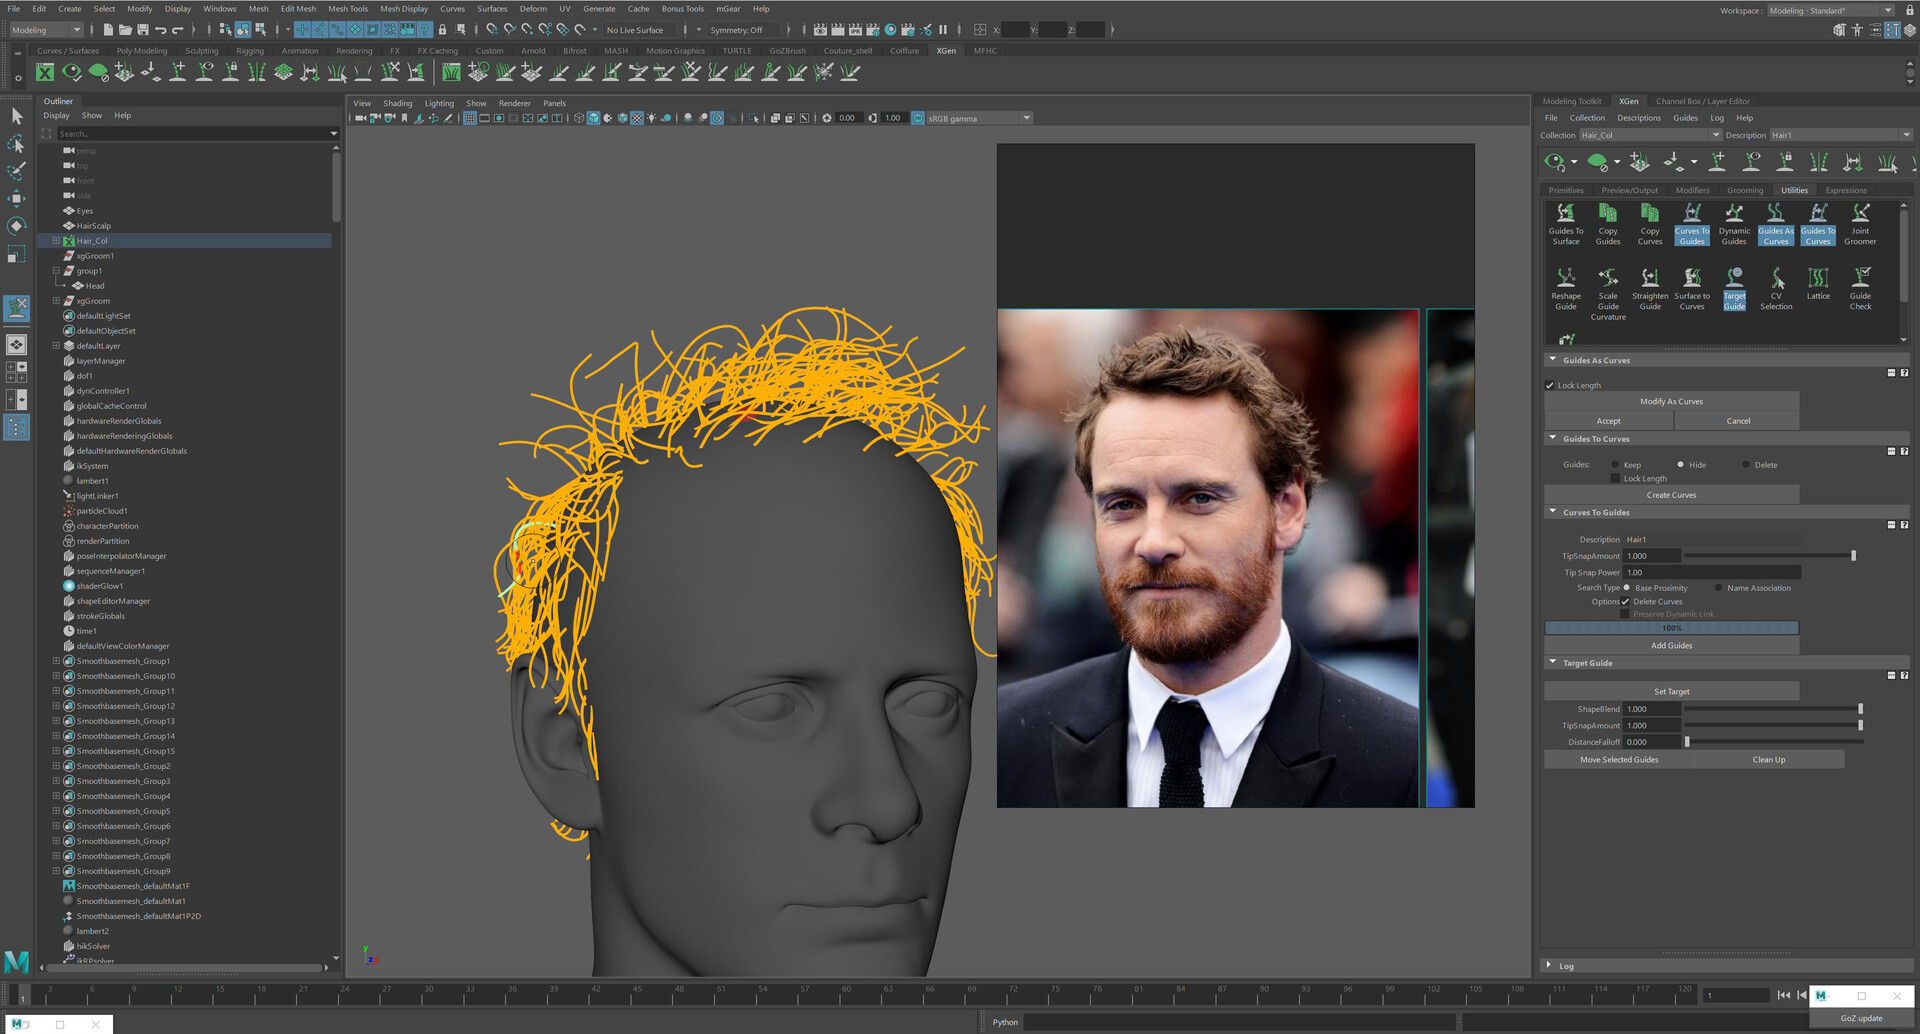
This step is not mandatory but in my opinion that something that is important for a successful haircut. You need to take all the benefits of having Xgen as a prototyping tool. It will allow you to iterate on shape and volume with all the iterative and procedural benefit that you can have with Xgen. By the end of this step you will have a model/render that can help you with your artistic direction/ validation process.
And the guides created during the process can later be converted to ribbon/haircards. In my opinion, it's easier to spend time during this part rather than placing haircards one by one, to discover at the end that the haircut doesn’t fit your character !
Step 1: Strand library
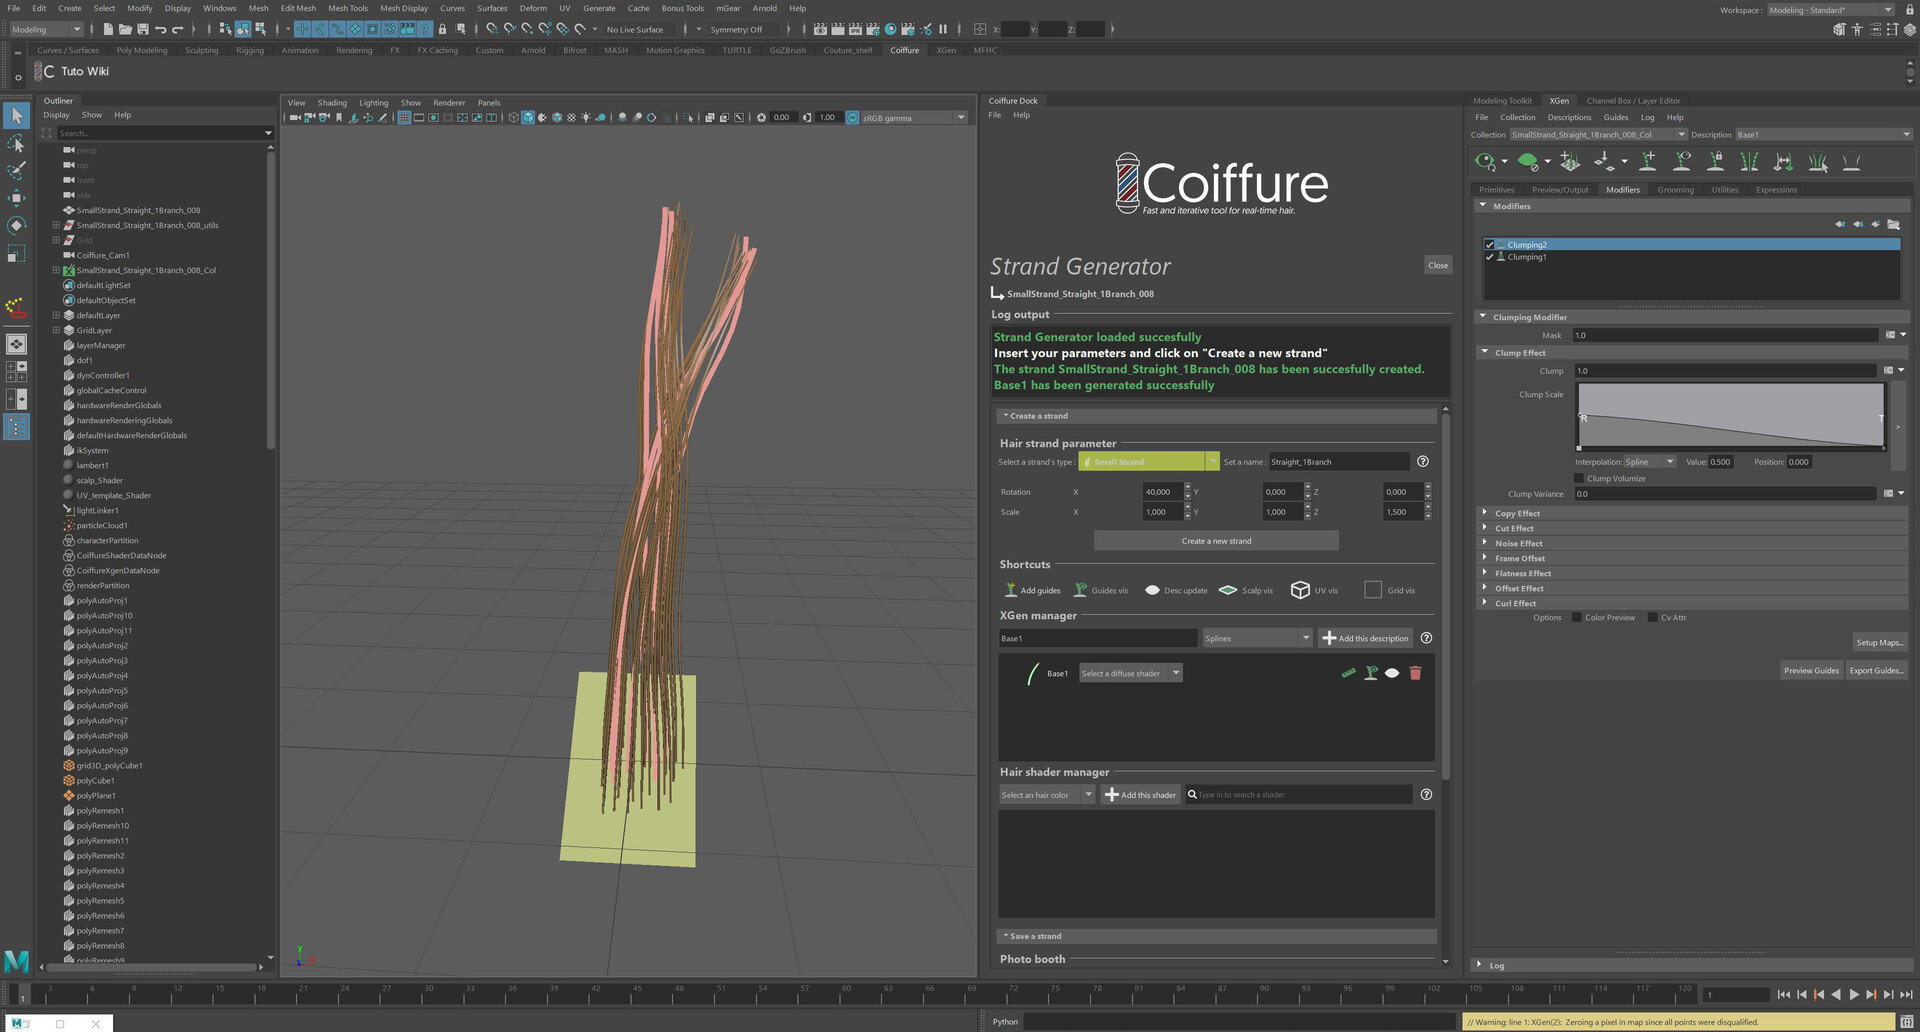
That’s my answer to speed improvement, creating a tool that rely on a library. By default Coiffure launch with a small library but it will be your job to grow it. Each time you create a new character you can enrich the library or re use a previous strand. Each strand can contains multiple descriptions and you can assign a predefined shader. To create a strand just have to set a name and a category. By default there are 8 categories, each one has a color and it will help you to find your strand later on. During this step there is nothing more than what you would usually do this workflow, add a couple guides, paint your maps and set up your modifier. One specificities of coiffure is that you can create what I call a “UV Box” it’s a simple cube and it later be used to auto generate UV’s. You just have to make sure that your strand fit into this box from a front view .Once you’re done just take a souvenir picture, it will help you to navigate through the library
Step 2: Create your textures
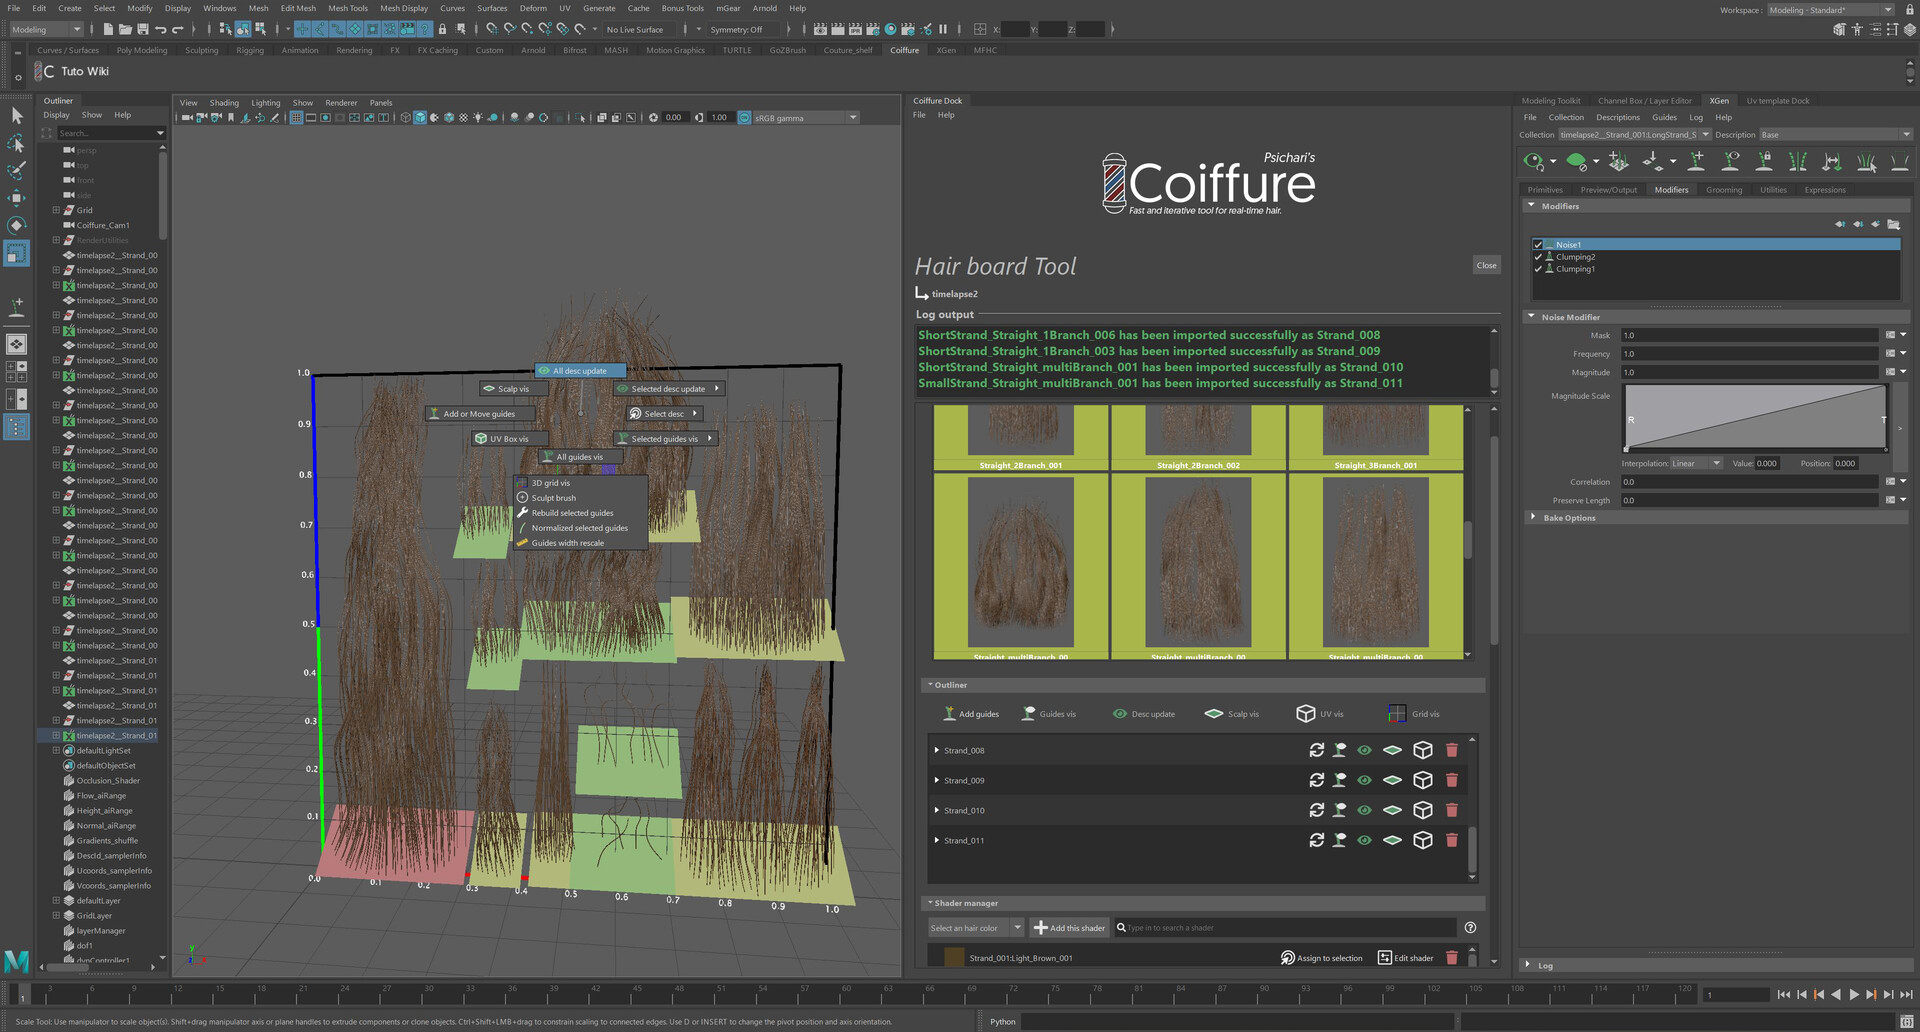
At this point we will create an “hair board project”, Coiffure will open its library and you will be able to import in your scene any strand that you created. Each of them will be imported as a new xgen project and it means that you can modify it. Since it’s a duplication all the change that you make won’t affect the library. But that's the beauty of it, at any time you can update your library, any change you make can then be applied to your haircard scene. In one click you can even swap a strand with another one to try different things without reinventing the wheel every time. And if you are familiar with Xgen you know that it’s not an easy task to import and export Xgen groom, the good news is that Coiffure will take care of everything. At this point the only thing that you have to do is to lay down your strand on the grid and customize your strand.You can adjust the scale but do not try to rotate them. For now Coiffure only work with straight uvs facing from bottom to top. I have plans to allow users to rotate the uv by 90°,180° or 270° but it won”t be in this first release.Don’t forget at this point to check if your “UV boxes” are set up correctly as well.
Set up different color shader on your strand, Coiffure has some color preset that can save you some time.
The Arnold manager is now waiting for you, you have the possibility to render 9 different AOV, each one of them is fully customizable. It will require 4 clic to set the option and just a single one to create those maps. And the beauty of it is that if you do some iteration you are just one click away from a new version. By the it’s Arnold the baking time will depend on your quality expectation and your computer power.
You don’t like Arnold ? No worries you can export everything to polystrips or tube and bake all your usual maps in your baking of choice such as Xnormal.
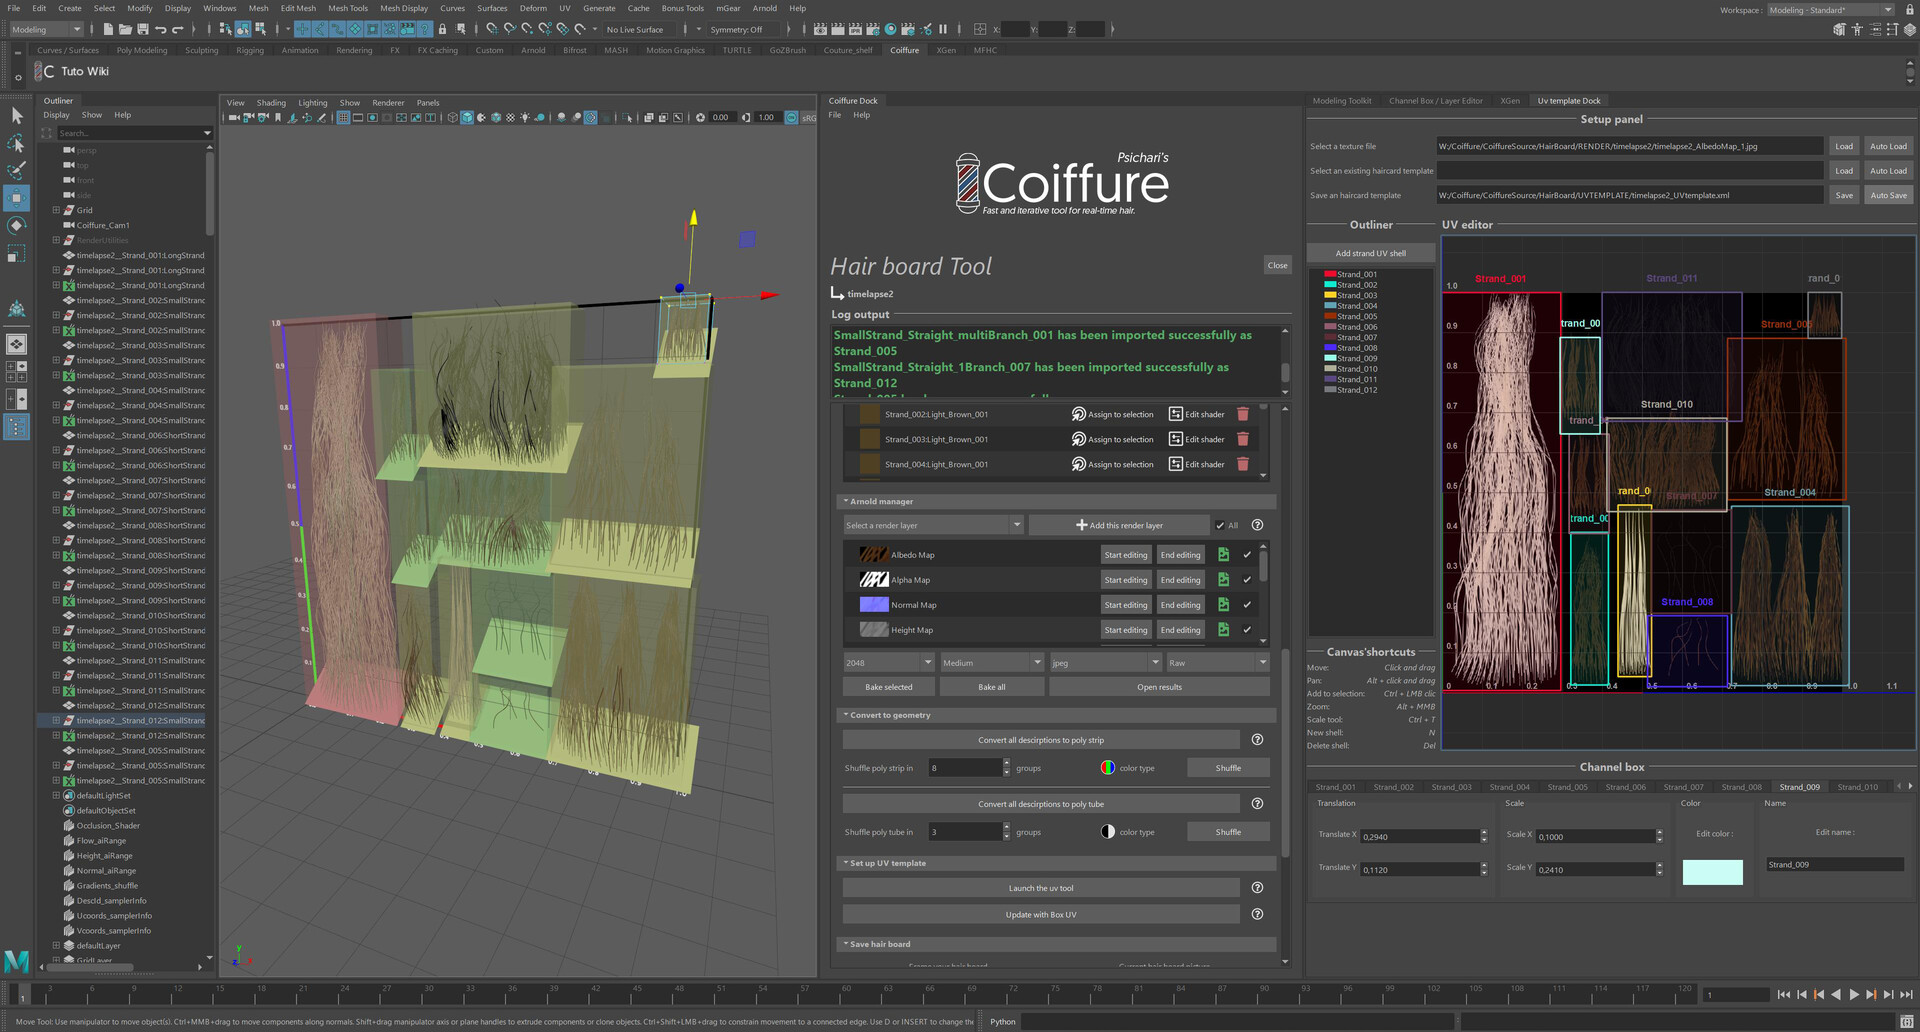
It's time to create a “UV template”. You might ask what is a “UV template” ? Well it’s a file that is generated by Coiffure to automatically assign and reassign a uvs shell on a selection of haircards. If you have set it up properly it will only take one click to change or update an entire character. If you remember the UV box, they can allow you to do this step automatically if everything fit inside the boxes. But also possible to manually adjust them or even create entirely by hand.
You’ve come this far ? Well take a deep breath, save your uv template. And take a little souvenir picture once again, you are now ready to save your project and move forward.
Step 3: Create your haircards
Congratulations on reaching step 3, it’s time to wrap everything together. Create a groom project and import your character in the project. You have now 2 options you can create/import your own haircards that have already created. Or you could convert hair curves in Coiffure’s ribbon. Let me introduce them, you are going to love them!
Well to be honest I didn’t plan to add them on the first release. Maya already includes a ribbon system that I find pretty useful. You can adjust their shapes after the conversion if you change the curve shape, you can edit the orientation, you can twist them, you can change the number of subdivisions and so on. However if you have already used them you also know that they have limitations. Mine are no different from the one that maya offers but I added 3 specificities that I guess are valuable :
1 The are automatically oriented according to the normal of a scalp mesh
And it will save you a lot of time ! Otherwise you will be trapped in a situation where you have to manually adjust 70 % of them and they don’t rotate in the same axis so I could be really tedious.
I will be honest my algorithm is not perfect but it will solve most of the case. Anyway, it's better to do a tweaking pass because sometimes the orientation can be good but not good enough depending on the style of haircut.
2 They can be duplicated and remain interactive
If you tried to duplicate ribbon from maya, it will only duplicate the mesh but not the curves underneath and all it’s properties will be baked. It’s sad because most of the time you will need to duplicate an interesting haircard in order to fill an empty space but you won’t be able to modify this new mesh… unless you are using my ribbon system. It’s tailored to be duplicated, all the parameter remain interactive !
3 You can create them using the ribbon brushes
Duplicate, move, rotate that 3 steps to create a new ribbon, let’s be more lazy and use a ribbon brush instead! This tool allows you to spawn on the scalp normals a ribbon which can be a copy of an existing one or a new one created within a template choice. It’s more fun to use and it’s kinda like using a guide tool in Xgen !
Wanna try them? Well if you have not skip step 0 you should now have a bunch of curves to play with. Set up your scalp, select them and hit convert !
At this point you have all your haircard, now it’s time to assign the uv and experiment!
You will define scalp section for example Hair,Beard, Eyebrows etc and a uv template will be assigned to each of them.
Inside each scalpt various groups will be created one for each strand and next to each strand a little plus icon appears. It means that you can assign one or several haircard to this strand and automatically it’s uv will be modified to fit the uv template in just one click you can re-assign this mesh to another hair strand and thus edit your groom in no time.
In one click an entire UV template can be updated or swap with another UV template, uv’s will be automatically re-assigned.
You are lazy as I am ? There is a shuffle option, you can select a bunch of haircard and a bunch of strand and in a second Coiffure will randomly assign a strand for each haircards, it’s magic !
Combining the ribbon system and the uv system is I think a cool new workflow and I could not wait to see what guys will come up with this.
Is Coiffure production ready ?
Well my former job was to create a pipeline in Maya, so even on my personal work that’s always something that I have in mind. As I did with Couture, reusability is one of my moto. Every single scene or project can be reopened and Coiffure will load all the previous data. Everything is saved into utility node in your scenes and they can even be manually modified even if I would not advise you to do it.
I created Coiffure with the idea that it should be used in a collaborative environment allowing for example a TD to set up a strand library available for all his teammates. All you need to do is to share the Coiffure source folder on common server so everyone in the team can access it and contribute to it.
For the project saving window there is even a progress status on each of them allowing you to review your teammates work or to keep track of your progress.
It has been tested on window with maya 2018 and should work on 2019 and 2020. It has been test on MacOS and Linux at this point I need some feedback it might take a few more iterations on those platform. But the good news is that I’m working on Coiffure as job and not a side project like Couture. I will be able to make fixes on a regular basis and to hear your feedback, do not hesitate to contact me! Coiffure need a valid internet connexion to be launch
A few words about user experience
During this project I learned a tremendous amount of knowledge using python and pyside. I tried to create a nice and polish interface. I wanted to say a few words about it because it’s something that can be easily missed. When I created the UV template editor I discover the Qgraphics item, it was a very challenging subject and I’m really proud of the result. It was a pain to achieve because when you are doing something wrong with this type of element, Maya simply crashes !
I made sure that you will have tooltip to help you directly inside the tool, warning messages to guide you through, a nice browsing experience inside the tool and most of all the possibility to reload the tool and the scene. I even added unnecessary UI element because I just found out that they were cool and interesting to create :D .
I also find ways to speed up the classical Xgen workflow. You are now just one click away to create a new description, you can easily manage the visibility of each description and of each description’s guide. But clicking on button can be also time consuming that’s why my tool also include marking menu to help improving your speed and comfort !
Coiffure’s pricing
That was maybe the hardest part for me, that’s not something I’m comfortable with. But as I said earlier, now I want to make a living out of it so I had to make some choices. Couture was free and I thank all the people who were kind enough to give me some money for it. On the other side Coiffure requires a lot more time and doesn’t have the same value.
I come up with this pricing 75 € for individual licence and 150 € for Studio licence.
Because sometimes you only need a tool or a software for a short amount of time it’s also possible to have a subscription licence for 5€/10€ a month so you can use it as you need.
You can get it on Gumroad with a -33% discount for the first 48H after the launch.
Coiffure’s future
During the upcoming weeks I will work on improving the tool thanks to your feedbacks. I also plan to release a full tutorial on how to make real-time hair and guess what ? … It will feature Coiffure ! After that I will take a break, I need one, I need to get back on creating art and characters !
However I have many ideas of new features such as feathers and other workflow improvement. But I don’t know when I will work on those but if you follow me on the social network you will be the first informed :)
I would be happy to share your work or tutorial let’s share #Coiffure !
I would also thank the people who helped me during the development of the tool :)
Cheers,
Florian