Disclaimer: Coiffure need an internet connexion to be launched. It’s working for Maya 2018 and above
Perpetual License > https://gum.co/vhMyu
Subscription License > https://gum.co/GcyWU
Demo head by Bao Vu: https://www.artstation.com/artwork/xogKW
Creating your first 3D haircut
That’s it, the moment you’ve been waiting for ! Let’s get started.
In the Coiffure panel select the create groom project button. Set a name, you can only have one project per name.
Scene setup
A loading panel will show up. You can load or pick object depending on the category.
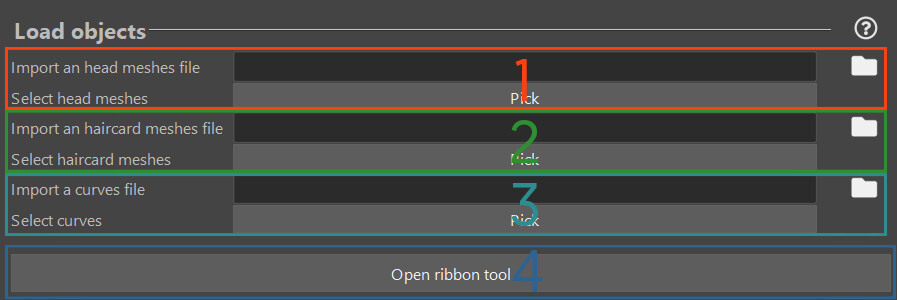
Head meshes will be your additional meshes, the head of course but it could be anything that help you to feel your character such as eyes, clothes etc
If you already have some haircard meshes, from another software, project etc. You can import them in the scene or just pick them. It’s only working with “mesh” type object and they must be separated object. Coiffure can handle the separation but it’s just a better practice.
Noticed that all the desired meshes must have been selected through one of these processes to let Coiffure knows about those objects. Later Coiffure will work exclusively on themIf you are just getting started with your haircut, you could import curve or pick some in the scene. Later on, you will be able to convert them into ribbon.
Use this button to launch the ribbon tool. Learn more about it here.
At this point you are ready to style your hair cards and adjust them as it pleases you. Personally during this step I would export my prototyped hair from Xgen as Curves. I would then convert them as Coiffure’s ribbon and adjust them with parameter. Then I would apply the uv template and go back an forth between tweaking the ribbon parameter, adding more ribbon and adjusting my textures/template. Good news is that Coiffure is specially tailored to speed up the process during all those steps !
Visibility panel
Here you will have 2 buttons:

This button is a drop down menu that will allow to set each groom visibility and templated mode
This button is a drop down menu that will allow to set the head group visibility and templated mode
This button is a drop down menu that will allow to set the haircard mesh group visibility and templated mode
-
This button is a drop down menu that will allow to set the curve group visibility and templated mode
As you can see I created tristate buttons, when the icon is just a contour the object are hidden, when the icon is grey the object are visible in template mode and when it’s green they are visible and selectable.
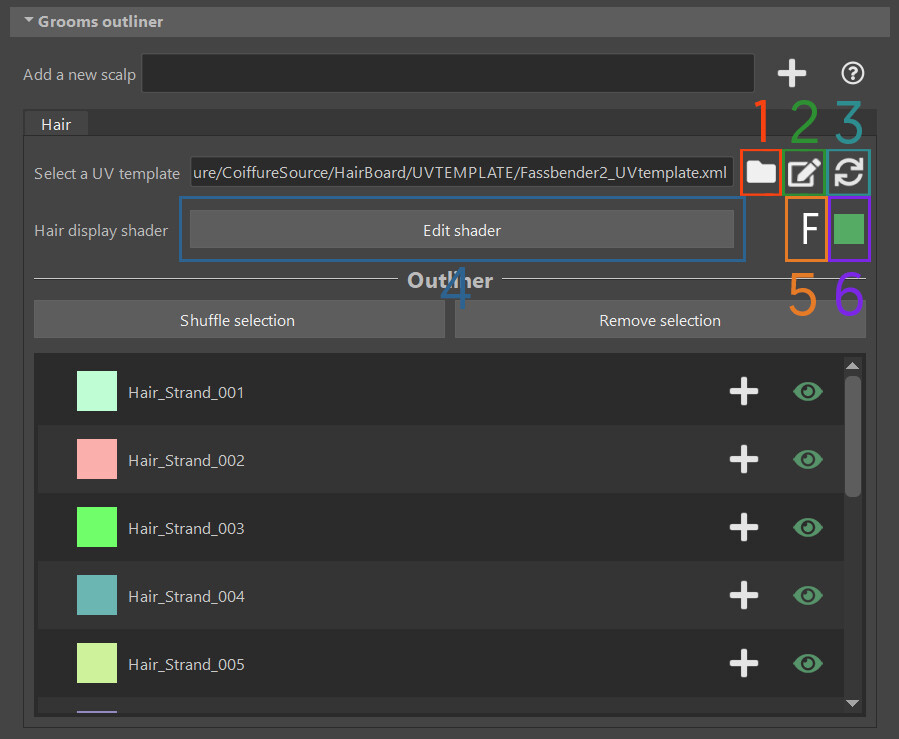
Grooms outliner
In this widget you will be able to manage multiple groom, one for each part of your character such as hair, beard, eyebrows etc … You need to create one for each uv template.
You will be able to easily navigate through the different tabs.
To create a new one set a name and click on the plus icon. A new tab will appear.
The folder icon will allow you to find your template, it should point directly to the template folder but you can pick a file anywhere on your disk
This button will open the UV template editor, allowing you to visualise your template and edit it as well. The texture file used when you created the template should be memorised and displayed by coiffure. Template UV file contain the path to the diffuse, Coiffure will auto guess the path for the normal and alpha map, don’t forget to bake them before using the template.
There is an update button, use it to reload your template after you made and saved your modification in the template editor.
This button opens a window which allows you to tweak the shader parameters. Coiffure will create a basic blin material, you can tweak the specular parameter and set the textures manually. Normally if you’ve created everything correctly, coiffure should find all the textures by itself.
This toggle button allow you to toggle ON and OFF the display of the normalmap on the strands.
This tristate button allows you to switch the display of the strand from plain color, plain color with alpha cutout, diffuse color with alpha cutout. The plain color mode will allow you to find strand assigned uvs easily.
Assigning hair cards to a strands
Once everything is set up properly you simply have to select haircards and click on the plus icon to assign it automatically to a desired strand. Open the UV edit, you will see it’s magic each time you pick a strand, uv’s are modified automatically! If you are updating the template of selecting a new one, uv’s will be updated as well.
If you are lazy as I’m there’s also a small handy feature, select a bunch of haircards and click on “shuffle selection”. A window will appear and it will ask ask you to select which strand will be the target of this shuffle, click ok and Coiffure will randomly assign to haircard to one of the strands.
As I said, it's very handy if you want to add more variety in the choice of your hairacard and it can be manually adjust later on.
If you want to remove an haircard from a strand, select it and click on “Remove selection”, this mesh will return to its default state.
Each strand group have a visibility tri state button, when the icon is just a contour the object are hidden, when the icon is grey the object are visible in template mode and when it’s green they are visible and selectable.
Photobooth
Before calling it done, you need to take a picture and to save your groom using the photobooth widget.
There’s 2 screen, the one on the right is a proper maya window that allow you to frame you strand and allow you to take the best picture. You can zoom in and out as you would normally expect in maya’s viewport.
You are lost the reset camera button will replace your camera at the origin of the world.
Once you are happy, hit the “take a picture” button, the result will be displayed in the second window.
Now you can update the progression status on this project, allowing you to keep track of things, especially if a whole team is working with Coiffure.
Getting ready for an in engine test
As a final touch for your haircut, it’s generally a good practice to transfer the normal of a simplified object on your haircards (or the head itself if you are working on small hair). Here’s an example :
Well Coiffure help you to take care of this process.
Beforehand, it's worth mentioning one thing, this process implies a delete history on the mesh to remove the link between the source object normal and the target object in order to bake the result.
However if we are using ribbons in our groom, such an operation would completely destroyed our editing capabilities. If such file is saved by the user, you could face a situation where you could not use the ribbon capabilities and as I said elsewhere in the documentation, one of the goal of this tool is to make the hair process as much iterative as possible.
To tackle this issue, coiffure will duplicate your groom into a copy, apply the new normal on it.This way in your scene you will have your result and your working meshes. You can hide/show each of them separately.
To be honest I would have loved to find a more clever solution, however it’s impossible to break this connexion and keep the ribbon’s attributes at the same time :/
You are not using ribbon it’s should not even be an issue, but still I chose this workaround for the tool and it will be the same process for you guys.
The tool will create a new tab window for each scalp and you need to process this step for each groom in your project
Getting ready for an in engine test
Once you are happy with your results, you need to export and test it.
Coiffure provide a basic export window that will allow you to export your work.
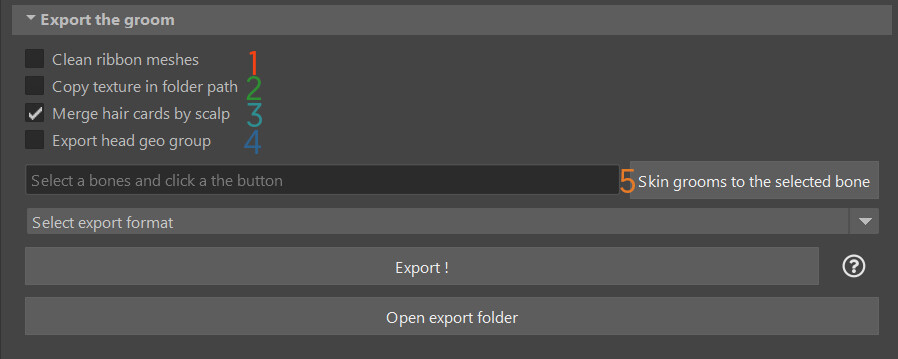
Some options are provided :
- Clean the attributes of your haircard meshes.
- This option will query and move the textures hold inside your UV template inside your export folder.
- This option merges the haircards of each scalp
- This option includes the mesh folder in the export
- This button set a bones as the parent bones for the haircards and the exported geo, this will work for a basic test scene but you might consider a better rigging setup for your final production
Finally you can export your result with FBX,obj, MB etc ...